
Land here is protected by GriefPrevention. Claims are your private territory — chests, builds, animals, anything inside is yours. Nobody can break blocks, open chests, or hurt tamed animals in your claim without your permission.
This page covers how to make a claim, what tools to use, the trust system, and how claim points (the currency you spend on land) work on this server.
The two tools 
You start with a golden shovel and a stick in your inventory on first join. Each has a different job:
- Golden shovel — the modification tool. Used to create, resize, and delete claims.
- Stick — the investigation tool. Used to inspect claims, see who owns them, and find claim boundaries.
To switch a tool to its claim mode, just hold it in your hand. There's nothing to activate.
Making your first claim 
- Hold the golden shovel.
- Right-click one corner of the area you want to protect. You'll see particles fly out from the block you clicked.
- Walk to the opposite corner of the same area.
- Right-click that corner. A message appears: "Claim established."
That's it. The two corners form a rectangular box — everything inside is now yours, from bedrock to sky. The corners can be up to ~200 blocks apart in each direction. Minimum size is 5×5 blocks (smaller claims auto-delete).
To resize an existing claim, hold the golden shovel, right-click a corner, then right-click the new corner. The claim shrinks or grows to fit.
To delete a claim, hold the golden shovel and right-click a corner while sneaking (shift). The whole claim you're standing in is removed.
How claim points work 
Claims cost points. The total area of all your claims, in blocks, must not exceed the points you have. A 20×30 claim costs 600 points (600 blocks of area).
How many points you get 
| Source | Points |
|---|---|
| First join bonus | 100 points (one-time) |
| Play time | +100 points per real-world hour online |
| Cap | 80,000 points (~33 days of active play) |
So a new player starts with 100 points, enough for a 10×10 starter base. After 5 hours of play, they've earned 600 more (cumulative 700 points from play time + bonus), enough for a 20×35 base. After a week of regular play, the cap is no longer a real constraint.
Check your current balance anytime with /claimslist. It shows every claim you own, the blocks each contains, your total used, and your total remaining.
Trust levels — sharing your claim 
You don't have to give someone full access to your claim to let them in. There are four tiers, from least to most:
| Command | What they can do |
|---|---|
/trust <player> |
Full access — build, break, use everything. Same as you. |
/containertrust <player> |
Use chests, furnaces, brewing stands, anvils, beds, buttons, levers. Cannot build or break. |
/accesstrust <player> |
Interact with the claim — doors, buttons, levers, beds. Cannot use chests or build. |
/permissiontrust <player> |
Everything you can do, including sharing trust with others. Use this carefully — it's effectively co-ownership. |
To revoke any of these, use /untrust <player> (works for all tiers).
Useful commands 
| Command | What it does |
|---|---|
/claimslist |
List all your claims, sizes, and remaining points. |
/trust <player> |
Grant full build access. |
/untrust <player> |
Revoke any tier of trust. |
/accesstrust <player> |
Grant interact-only access. |
/containertrust <player> |
Grant chest-and-interact access. |
/permissiontrust <player> |
Grant co-ownership (with share rights). |
/abandonclaim |
Delete the claim you're standing in. (Sneak + golden shovel does the same.) |
/abandonallclaims |
Delete every claim you own. |
/subdivideclaims |
Switch the shovel to subdivision mode — useful for splitting a large claim into smaller protected zones (e.g. a public area inside your main claim that others can build in). |
Where you can claim 
Claims work in the overworld only on this server. The Nether and The End have claiming disabled — you cannot create claims there, and claims don't extend into those dimensions.
If you build a portal in your claim, the corresponding area in the Nether is not automatically protected. Bring only what you can carry back, or set up a chest outside the portal.
What claims do and don't protect 
Claims protect against:
- Other players breaking or placing blocks
- Other players opening chests, furnaces, hoppers, barrels, shulker boxes
- Other players using buttons, levers, doors, beds
- Other players killing your tamed animals (wolves, cats, horses, parrots, etc.)
- PvP inside your claim (when the world has PvP enabled, attackers are blocked from fighting you in your own land)
- Explosions (creepers, TNT, end crystals) from damaging blocks inside your claim — disabled server-wide
Claims do NOT protect against:
- The environment (lava, fire, water flow) — these can still damage your stuff
- Yourself — there's no undo for breaking your own claim or losing your own items
- Items dropped on death outside a claim (this is governed by
KeepInventoryand related settings, not GriefPrevention)
GPExpansion — Rentals, Selling, Mailboxes, and Snapshots 
Our land protection includes GPExpansion, adding advanced features on top of GriefPrevention for renting, selling, depositing items, and managing claim states.
🏠 Rental Signs 
Claim owners can rent out their claims (or subdivisions) to other players using signs.
- Setup Wizard: Use the
/rentclaimcommand to set up rental terms easily. - Flexible Payments: Supports Vault economy, experience points, claim blocks, or custom item-based payments.
- Automated Trust: Automatically grants container/build trust to the renter when rental starts, and revokes it instantly upon expiry or eviction.
🏷️ Sell Signs 
Owners can permanently sell their claims to other players using signs.
- Setup Wizard: Use
/sellclaimto set a price and link a sign. - Ownership Transfer: Upon purchase, claim ownership automatically transfers to the buyer along with all claim blocks and permissions.
📬 Claim Mailboxes (Detailed Guide) 
Every claim can have designated mailboxes where other players can securely deposit items even when you are offline.
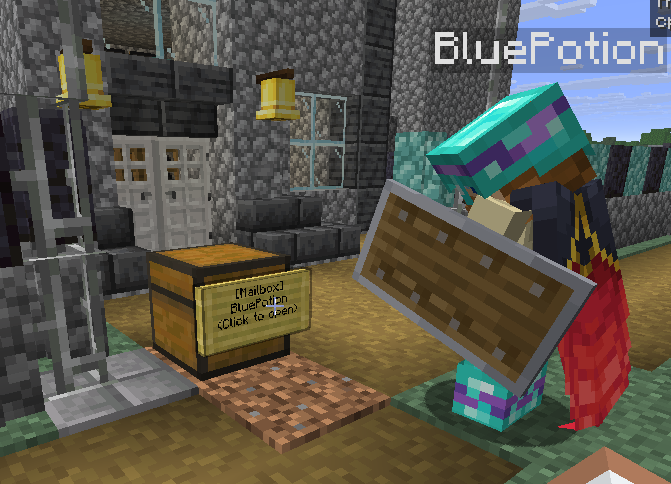
How to Create a Mailbox 
There are two ways to create a mailbox in your claim:
- Interactive Wizard (
/mailbox):- Stand inside your claim and type
/mailbox. - Follow the interactive menu prompts to configure, place, or manage your mailboxes.
- Stand inside your claim and type
- Instant Sign Placement (
[Mailbox]wall sign):- Place a wall sign directly on top of a container (chest, barrel, etc.) inside a claim you own or rent.
- Write
[Mailbox]on the first line of the sign. - The sign automatically registers as an active mailbox (subject to your claim's
defaults.max-self-mailboxes-per-claimlimit).
Protocol Types & Behavior 
GPExpansion supports two protocol modes for mailboxes:
- Real Protocol:
- Creates a physical container (1x1x1 subdivision in GP3D or 1x1 in regular GP) with public container trust.
- Changes update live. Note: These containers cannot be stacked directly on top of each other.
- Virtual Protocol:
- Uses a virtual snapshot inventory.
- Non-owners see a snapshot of the inventory at the moment they open it. Changes commit only when the menu closes, allowing reversible deposits before closing. Items are safely returned if the mailbox fills up while viewing. Mailboxes using this protocol can be stacked.
How Players Use Mailboxes 
- Non-owners: Right-clicking the mailbox opens a deposit interface to leave items for the claim owner.
- Claim Owners: Have full access to open the mailbox, retrieve all deposited items, and manage storage.
- Storage Alerts: The system provides warnings when a mailbox is nearing its storage capacity.
📸 Rental Restoration Snapshots 
For server admins and rental management, Rental Snapshots allow saving and restoring a claim's exact block state between renters.
/claim snapshot create [claimId]— Save current claim blocks as a restoration snapshot./claim snapshot list [claimId|all]— View available snapshots./claim snapshot remove <snapshotId>— Delete a snapshot. When a rental or eviction ends, the claim can be automatically restored to its original snapshot state so the next renter receives a clean build.
Tips from the existing setup 
-
Start small. A 10×10 claim at spawn is enough for a starter base. You can always expand later, and shrinking then expanding wastes points if you misjudge.
-
Use
containertrustovertrustfor friends who just want to share resources. They can grab from your chest farm without being able to grief your build. -
/claimslistis the truth. The number it shows is the number. If you think points are wrong, that's the command to check.